
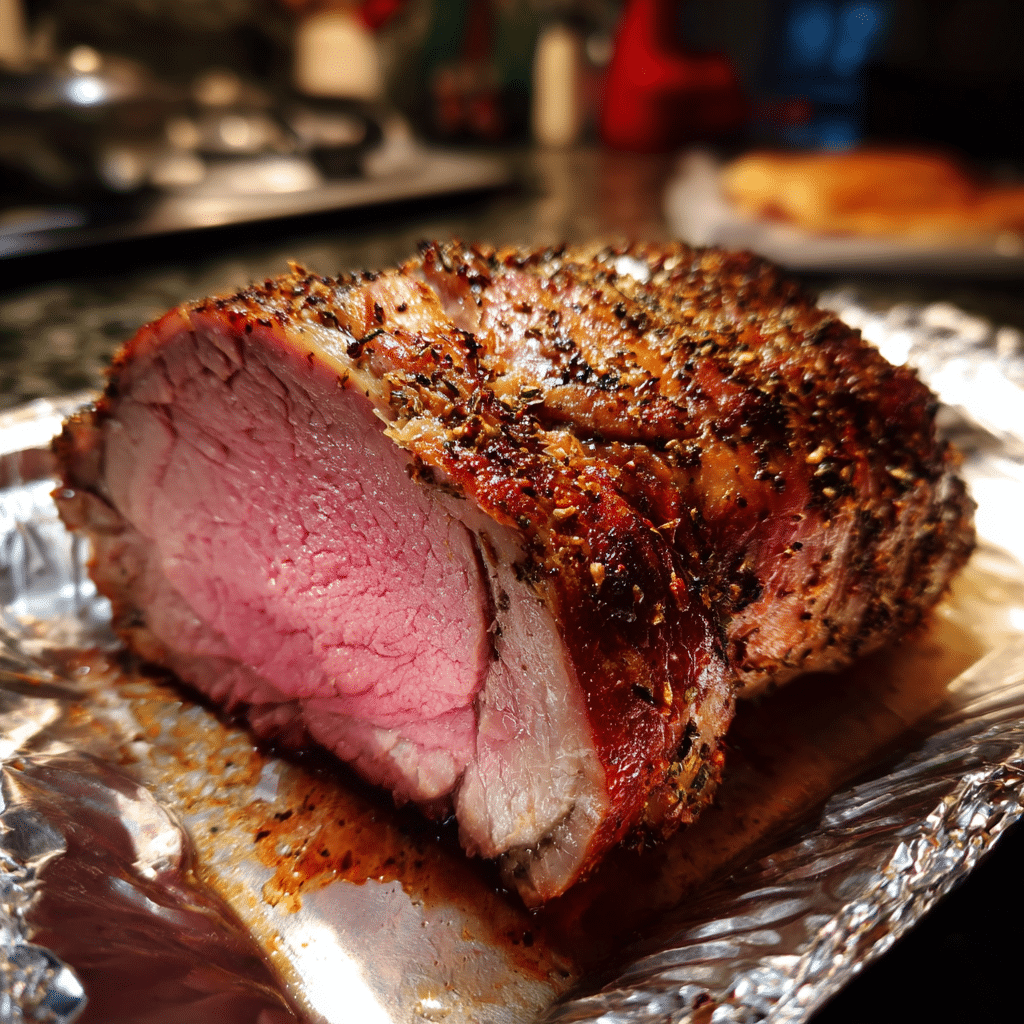
If you’ve ever dreamed of making perfectly tender, juicy roast beef without the stress of constant monitoring, the Envelope-Method Roast Beef is your new go-to recipe. This old-fashioned cooking technique involves sealing the beef tightly in foil — like an envelope — and slow-roasting it to perfection. The result is an unbelievably tender roast with rich, natural juices that lock in every ounce of flavor. It’s classic, simple, and absolutely delicious.
The first time I made this, I used a top round roast and was amazed at how evenly it cooked — juicy inside, beautifully browned outside. The “envelope” traps moisture like a mini oven inside your oven, ensuring the beef never dries out. Serve it with mashed potatoes, roasted vegetables, or gravy made from the drippings, and you’ll have a meal worthy of any Sunday dinner table.
Why You’ll Love This Recipe
This Envelope-Method Roast Beef takes the guesswork out of roasting. It’s tender, flavorful, and practically self-basting. No special tools, no constant checking — just seal, bake, and let the oven do the work. The foil packet keeps the meat moist and evenly cooked, while the low, slow roasting ensures maximum tenderness. Perfect for family dinners, holidays, or special occasions, this recipe delivers that “melt-in-your-mouth” experience every time.
Print
Envelope-Method Roast Beef: Tender, Juicy, and Foolproof Every Time
- Total Time: 3 hrs 10 mins
- Yield: 6–8 servings
Description
Envelope-Method Roast Beef is a foolproof way to make tender, flavorful roast beef using a simple sealed ‘envelope’ of foil or parchment. This slow-roasting technique locks in moisture and flavor, resulting in perfectly cooked beef every time — juicy inside with a beautifully browned crust.
Ingredients
- 3–4 lb beef roast (top sirloin, rump, or eye of round)
- 2 tbsp olive oil
- 2 tsp kosher salt
- 1 tsp black pepper
- 1 tsp garlic powder
- 1 tsp onion powder
- 1 tsp dried thyme or rosemary
- 1/2 tsp paprika
- 1 tbsp Worcestershire sauce
- 1/2 cup beef broth or water
Instructions
- Preheat oven to 400°F (200°C).
- Pat the roast dry with paper towels. Rub olive oil all over, then season with salt, pepper, garlic powder, onion powder, thyme, and paprika.
- Lay out two large sheets of heavy-duty aluminum foil (or parchment paper) and overlap them to form a large surface. Place the seasoned roast in the center.
- Drizzle Worcestershire sauce and pour beef broth over the roast.
- Fold the foil tightly around the roast, sealing all edges to create an airtight ‘envelope.’ Place on a roasting pan or baking sheet, seam side up.
- Roast in the preheated oven for 1 hour. Without opening the envelope, turn off the oven and leave the roast inside for 2–3 hours (do not open the door during this time).
- After resting, remove from the oven, open the foil carefully, and check the internal temperature — it should be about 135°F (medium rare) to 145°F (medium).
- Transfer roast to a cutting board, tent loosely with foil, and let rest for 10–15 minutes before slicing thinly against the grain.
Notes
- Do not open the oven door during the resting period — it’s key to the ‘envelope’ method’s success.
- Use an oven-safe thermometer probe if you want to monitor temperature without breaking the seal.
- Add sliced onions or herbs inside the foil for extra aroma and flavor.
- Leftovers make excellent sandwiches or salads.
- Prep Time: 10 mins
- Cook Time: 1 hr active + 2 hrs resting
- Category: Main Course
- Method: Roasting
- Cuisine: American
Ingredients
(Tip: You can find the complete list of ingredients and their measurements in the recipe card below.)
Beef Roast (Top Round, Sirloin Tip, or Eye of Round) – Lean and flavorful cuts that work perfectly for this slow-cooking method.
Salt and Black Pepper – The foundation of seasoning; enhances the natural beef flavor.
Garlic Powder – Adds depth and savory aroma to the roast.
Onion Powder – Enhances the umami flavor and complements the beef.
Paprika – Adds a mild smokiness and helps with browning.
Olive Oil or Vegetable Oil – Helps the seasoning adhere and promotes a crisp outer crust.
Beef Broth or Water – Optional, for a bit of steam inside the foil packet to keep the roast extra juicy.
Worcestershire Sauce (optional) – Adds rich, savory undertones.
Fresh Rosemary or Thyme (optional) – Infuses the beef with a subtle herbal aroma.
Directions
Preheat your oven to 350°F (175°C).
Pat the beef roast dry with paper towels. In a small bowl, mix salt, pepper, garlic powder, onion powder, and paprika. Rub the mixture all over the roast, then drizzle lightly with olive oil to help the seasoning stick.
Place a large sheet of heavy-duty aluminum foil on your counter — large enough to completely wrap the roast. Set the seasoned roast in the center. For extra moisture, pour 2–3 tablespoons of beef broth or water over the top and drizzle with Worcestershire sauce if desired.
Fold the foil tightly around the roast to form a sealed “envelope,” making sure no juices can escape. Place the wrapped roast on a shallow baking pan or roasting tray.
Bake at 350°F for 2½ to 3 hours, depending on the size of your roast (about 20 minutes per pound). Do not open the foil during cooking — that’s the key to trapping in all the juices.
When the time is up, remove the roast from the oven but do not unwrap it immediately. Let it rest, still sealed, for 30 minutes. This allows the juices to redistribute, keeping the beef tender and moist.
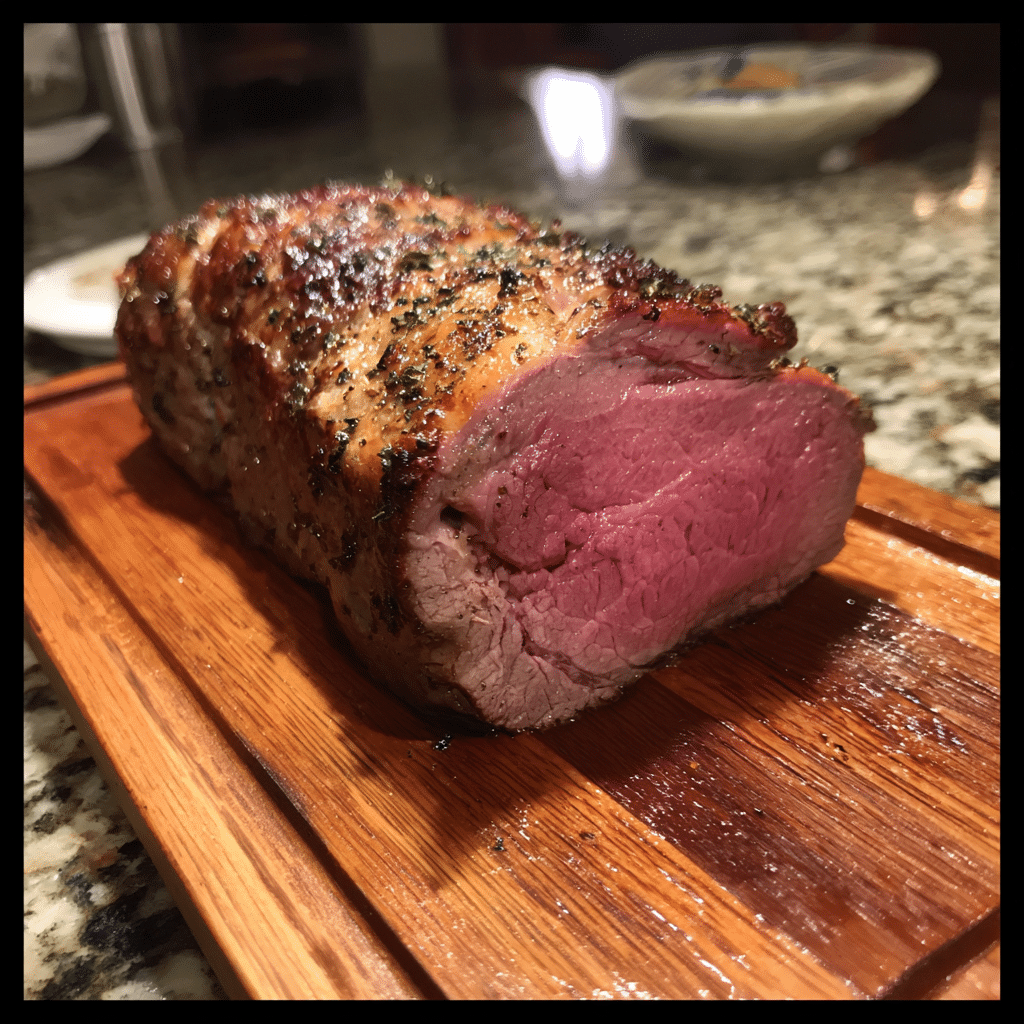
After resting, carefully open the foil — the steam will be hot — and transfer the roast to a cutting board. Slice thinly against the grain for the most tender results. Serve with the flavorful juices spooned over the top.
Equipment needed :
Must-Have Tools to Get Rolling
Here’s what you’ll want to have on hand:
Silicone Spatula – Durable, heat-resistant silicone spatula perfect for mixing, scraping, and spreading. Gentle on non-stick cookware and easy to clean.
Large pot – You’ll need this to boil the whole cabbage head and soften the leaves.
large bowl –Spacious, durable large bowl ideal for mixing, serving, or food preparation. Made from sturdy material and easy to clean.
Sharp knife – For coring the cabbage and slicing out the thick stem in each leaf. A paring knife works best.
Mixing bowl – A big bowl makes it easier to combine your meat and rice filling evenly.
Cutting board – For prepping cabbage leaves and rolling them like a pro.
9×13-inch baking dish – Ideal size to fit your rolled cabbage leaves snugly and prevent them from unraveling.
knife – A sharp, durable kitchen knife perfect for slicing, chopping, and dicing with ease.
Servings and timing
This recipe serves about 6–8 people. Preparation takes 10 minutes, cooking requires about 2½–3 hours, and resting takes 30 minutes. Total time: around 3½ hours.
Storage/reheating
Store leftover roast beef in an airtight container with a bit of its cooking juices for up to 3 days in the refrigerator. To reheat, wrap slices in foil and warm in a 325°F (160°C) oven for 10–15 minutes, or heat gently in a skillet with a splash of broth. You can also freeze the cooked roast for up to 2 months — just thaw overnight before reheating.
Variations and Customizations
Herb-Crusted Roast Beef – Add chopped rosemary, thyme, and a touch of Dijon mustard to the rub for a fragrant crust.
Garlic-Lover’s Roast – Rub the meat with minced fresh garlic or garlic paste before sealing.
Smoky Paprika Roast – Add smoked paprika for deeper flavor and color.
Balsamic Glaze Version – Drizzle balsamic vinegar over the roast before wrapping for a tangy, caramelized finish.
Vegetable Packet Roast – Add sliced onions, carrots, and potatoes to the foil for a complete one-pan meal.
Red Wine Roast – Substitute a few tablespoons of beef broth with red wine for a rich, complex flavor.
Honey Dijon Twist – Mix a bit of honey and mustard into the seasoning rub for a subtle sweet-savory glaze.
Spicy Roast – Add cayenne pepper or chili flakes for a bit of heat.
Low-Sodium Version – Use reduced-sodium broth and limit added salt.
Gravy Lovers’ Roast – Use the juices from the foil to make an easy pan gravy — simply whisk with a bit of flour and butter.
FAQs
What is the Envelope Method for Roast Beef?
It’s a technique where the beef is sealed in foil (like an envelope) before roasting, trapping in moisture and flavor.
Why should I not open the foil while it cooks?
Opening it releases the trapped steam and moisture that keep the roast juicy.
What cut of beef works best?
Top round, sirloin tip, or eye of round are ideal for this method.
Can I use this method for pork or chicken?
Yes! It works beautifully for pork tenderloin or whole chicken.
How do I know when it’s done?
Use a meat thermometer — medium-rare is 135°F, medium is 145°F, and well-done is 160°F.
Can I add vegetables to the packet?
Definitely — carrots, potatoes, onions, and celery roast beautifully alongside the meat.
Does the foil need to be heavy-duty?
Yes, to prevent tearing and leaking. If using regular foil, double-wrap the roast.
Should I sear the meat first?
You can, but it’s optional. The foil locks in enough flavor and moisture even without searing.
Can I make gravy from the drippings?
Yes — the juices in the foil make an excellent base for homemade gravy.
How long should I rest the meat before slicing?
At least 30 minutes to retain juiciness and ensure tender slices.
Conclusion
Envelope-Method Roast Beef is a timeless, foolproof way to make a juicy, tender roast with minimal effort. The sealed foil method locks in flavor and moisture, producing results that rival any traditional roasting technique. Perfect for family dinners or special occasions, this recipe delivers incredible flavor and melt-in-your-mouth texture every time. Simple, classic, and truly satisfying — this roast proves that sometimes, the old-fashioned methods really are the best.
Hungry for more? Visit our website for full recipes and follow us on Pinterest for daily foodie inspo you’ll love to pin!