

If you’re looking for a fun and flavorful twist on classic burgers, these Garlic Parmesan Cheeseburger Bombs are going to be your new favorite party food. Imagine juicy, seasoned beef and melted cheese wrapped inside soft golden dough, brushed with buttery garlic and sprinkled with Parmesan—it’s pure comfort in every bite. I tried these fresh out of the oven with a side of homemade dipping sauce, and they disappeared faster than I could make them. Whether served as a game-day snack, appetizer, or weeknight dinner, these irresistible bites are guaranteed to please.
Why You’ll Love This Recipe
These Garlic Parmesan Cheeseburger Bombs take everything you love about a cheeseburger and turn it into an easy, handheld treat. They’re perfectly crispy on the outside and gooey on the inside, with layers of rich flavor from buttery garlic, melted cheese, and savory beef. They’re quick to prepare with simple ingredients—plus, you can bake or air-fry them for convenience. Perfect for sharing (or not!), these cheesy burger bombs are ideal for parties, family dinners, or when you want to impress guests with something deliciously unexpected.
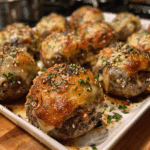
Garlic Parmesan Cheeseburger Bombs – The Ultimate Cheesy, Garlicky Snack
- Total Time: 35 mins
- Yield: 8 cheeseburger bombs
- Diet: Halal
Description
Garlic Parmesan Cheeseburger Bombs are golden, buttery biscuit pockets stuffed with juicy seasoned beef, melted cheese, and savory garlic-parmesan butter. These handheld bites are perfect for parties, game days, or an easy weeknight dinner everyone will love.
Ingredients
- 1 lb ground beef
- 1/2 tsp salt
- 1/2 tsp black pepper
- 1/2 tsp garlic powder
- 1/2 tsp onion powder
- 2 tbsp ketchup
- 1 tbsp mustard
- 1 tbsp Worcestershire sauce
- 1 cup shredded cheddar cheese (or American cheese slices)
- 1 can refrigerated biscuit dough (8-count, like Pillsbury Grands)
- 2 tbsp unsalted butter, melted
- 2 cloves garlic, minced
- 2 tbsp grated Parmesan cheese
- 1 tbsp chopped parsley (optional)
Instructions
- Preheat oven to 375°F (190°C). Line a baking sheet with parchment paper.
- In a skillet over medium heat, cook ground beef until browned and crumbly. Drain excess grease.
- Stir in salt, pepper, garlic powder, onion powder, ketchup, mustard, and Worcestershire sauce. Mix well and cook for 2–3 minutes. Remove from heat and let cool slightly.
- Flatten each biscuit into a 4–5 inch circle. Spoon 1–2 tablespoons of the beef mixture into the center of each biscuit, then top with some cheese.
- Fold edges of biscuit over filling and pinch to seal completely. Place seam-side down on the baking sheet.
- In a small bowl, mix melted butter, minced garlic, and Parmesan cheese.
- Brush the tops of the biscuit bombs with the garlic-parmesan butter mixture.
- Bake for 15–18 minutes, or until golden brown and cooked through.
- Brush with any remaining garlic butter after baking and sprinkle with parsley if desired.
- Serve warm with ketchup, ranch, or burger sauce for dipping.
Notes
- Use mozzarella or pepper jack cheese for a fun flavor twist.
- Make ahead and refrigerate unbaked bombs for up to 1 day before baking.
- Perfect for freezing — bake, cool, then freeze for up to 2 months. Reheat in the oven for 10 minutes.
- Prep Time: 15 mins
- Cook Time: 20 mins
- Category: Appetizer
- Method: Baked
- Cuisine: American
Ingredients
(Tip: You can find the complete list of ingredients and their measurements in the recipe card below.)
Ground Beef: The heart of the filling—choose 80/20 for juicy, flavorful meat.
Onion: Adds a subtle sweetness and enhances the savory flavor of the beef.
Garlic Powder: Brings depth and complements the Parmesan topping.
Salt and Pepper: Essential seasonings to balance and enhance the flavors.
Cheddar Cheese: Melts beautifully into the beef for that signature cheeseburger taste.
Biscuit Dough or Pizza Dough: The wrapping that creates that soft, golden exterior.
Butter: Used for brushing over the baked bombs to make them rich and glossy.
Fresh Garlic: Minced and mixed into melted butter for that irresistible garlic aroma.
Parmesan Cheese: Adds a salty, nutty finish when sprinkled over the buttery tops.
Parsley: Optional, for garnish and a fresh pop of color.
Optional Add-Ins: Crumbled bacon, diced pickles, or a dab of burger sauce inside for extra flavor.
Directions
Preheat your oven to 375°F (190°C) and line a baking sheet with parchment paper.
In a skillet over medium heat, cook the ground beef and diced onion until the beef is browned and the onion is soft, about 5–7 minutes. Drain any excess fat, then season with salt, pepper, and garlic powder. Stir in the shredded cheddar cheese until melted and combined. Remove from heat and let cool slightly.
Divide the biscuit or pizza dough into equal portions (about 8–10 pieces). Flatten each piece into a small circle, then spoon a tablespoon of the beef mixture into the center. Fold the dough around the filling and pinch the edges to seal tightly, forming a ball. Place each ball seam-side down on the prepared baking sheet.
Bake for 12–15 minutes, or until golden brown. While they bake, melt butter in a small saucepan with minced garlic and a pinch of salt. When the bombs come out of the oven, brush them generously with the garlic butter and sprinkle Parmesan cheese over the top.
Garnish with chopped parsley if desired, and serve warm with dipping sauces like ketchup, ranch, or burger sauce.
Equipment needed :
Must-Have Tools to Get Rolling
Here’s what you’ll want to have on hand:
Silicone Spatula – Durable, heat-resistant silicone spatula perfect for mixing, scraping, and spreading. Gentle on non-stick cookware and easy to clean.
Large pot – You’ll need this to boil the whole cabbage head and soften the leaves.
large bowl –Spacious, durable large bowl ideal for mixing, serving, or food preparation. Made from sturdy material and easy to clean.
Sharp knife – For coring the cabbage and slicing out the thick stem in each leaf. A paring knife works best.
Mixing bowl – A big bowl makes it easier to combine your meat and rice filling evenly.
Cutting board – For prepping cabbage leaves and rolling them like a pro.
9×13-inch baking dish – Ideal size to fit your rolled cabbage leaves snugly and prevent them from unraveling.
knife – A sharp, durable kitchen knife perfect for slicing, chopping, and dicing with ease.
Servings and timing
This recipe makes 8–10 cheeseburger bombs.
Prep time: 15 minutes
Cook time: 15 minutes
Total time: 30 minutes
Perfect for serving 4–6 people as an appetizer or light meal.
Storage/reheating
Store leftovers in an airtight container in the refrigerator for up to 3 days. Reheat in the oven or air fryer at 350°F (175°C) for 5–7 minutes until warmed through. You can also freeze the baked bombs for up to 2 months—reheat straight from frozen in a preheated oven for about 10 minutes.
Variations and Customizations
Bacon Cheeseburger Bombs: Add crumbled cooked bacon to the filling for an extra savory punch.
Pickle-Stuffed Bombs: Add a slice of dill pickle inside each dough ball for a tangy surprise.
BBQ Cheeseburger Bombs: Stir a tablespoon of BBQ sauce into the beef mixture for a smoky twist.
Spicy Version: Add chopped jalapeños or a dash of hot sauce for some heat.
Breakfast Bombs: Swap ground beef for cooked sausage and add scrambled eggs and cheese.
Pizza-Style Bombs: Replace the beef with pepperoni and mozzarella, then dip in marinara sauce.
Air Fryer Option: Air-fry at 350°F (175°C) for 10–12 minutes, turning halfway through.
Pretzel Bombs: Use pretzel dough instead of biscuit dough and brush with baking soda solution before baking for a chewy crust.
Vegetarian Version: Substitute the beef with sautéed mushrooms, onions, and peppers.
Mini Sliders: Make smaller portions for bite-sized party appetizers.
FAQs
1. Can I use pizza dough instead of biscuit dough?
Yes, pizza dough works perfectly and gives a slightly chewier texture.
2. Can I make these ahead of time?
Yes, assemble them in advance, refrigerate for up to 24 hours, and bake when ready.
3. Can I freeze Garlic Parmesan Cheeseburger Bombs?
Absolutely! Freeze before or after baking and reheat straight from frozen.
4. What dipping sauces go best with these?
Ketchup, ranch, honey mustard, or burger sauce all pair wonderfully.
5. Can I use ground turkey instead of beef?
Yes, ground turkey or chicken works as a lighter alternative.
6. How do I keep them from bursting open?
Don’t overfill and make sure the dough is sealed tightly before baking.
7. Can I add veggies to the filling?
Yes—try sautéed mushrooms, peppers, or even spinach for extra flavor.
8. How do I make them extra cheesy?
Add a cube of cheddar or mozzarella inside each bomb before sealing.
9. Can I cook them in an air fryer?
Yes, 10–12 minutes at 350°F works perfectly for golden, crispy results.
10. How long do they stay fresh?
They’re best fresh from the oven but will keep well for up to 3 days refrigerated.
Conclusion
These Garlic Parmesan Cheeseburger Bombs combine everything you love about cheeseburgers into one irresistible, bite-sized package. With a golden crust, gooey cheese, and a garlicky butter finish, they’re the ultimate comfort food that’s both fun and satisfying. Whether served as a snack, appetizer, or main dish, these flavorful bombs are guaranteed to steal the spotlight at any meal. Serve them warm, watch them disappear, and enjoy the deliciously cheesy explosion in every bite.