Simple, comforting, and deeply traditional, Irish Potato Farls are a cherished staple of the classic Irish breakfast. Made from mashed potatoes, flour, butter, and a pinch of salt, these golden, pan-fried delights are crispy on the outside and soft on the inside. They’re proof that humble ingredients can create something extraordinary. I remember trying these for the first time with a full Irish breakfast — eggs, bacon, and sausages — and they stole the show with their buttery texture and subtle flavor. Whether served with butter, jam, or a hearty fry-up, these farls are a true taste of Ireland’s culinary heritage.
Why You’ll Love This Recipe
This Traditional Irish Potato Farls Recipe is as simple as it is satisfying. It’s an ideal way to use leftover mashed potatoes and takes just a few minutes to prepare. With minimal ingredients, you can create a warm, comforting side dish that pairs beautifully with any breakfast or brunch. The farls are soft, tender, and slightly crisp along the edges — perfect for soaking up sauces, eggs, or butter. They’re also versatile enough to serve as a quick snack, side dish, or even the base for creative modern twists.

Traditional Irish Potato Farls Recipe – A Classic Breakfast Delight
- Total Time: 20 mins
- Yield: 4 servings
- Diet: Vegetarian
Description
Traditional Irish Potato Farls are a beloved classic, made from mashed potatoes, butter, and flour to create soft yet crisp griddle cakes. Served as part of a traditional Irish breakfast, these golden, tender farls are simple, comforting, and deeply satisfying.
Ingredients
- 2 cups mashed potatoes (about 1 lb or 450g cooked potatoes)
- 2 tbsp unsalted butter
- 1/2 cup all-purpose flour (plus extra for dusting)
- 1/2 tsp salt
- 1/4 tsp black pepper (optional)
Instructions
- Peel and boil potatoes in salted water until tender. Drain and mash until smooth while still warm.
- Add butter to the warm potatoes and stir until melted and combined.
- Mix in flour and salt, forming a soft dough. Add a touch more flour if sticky.
- Turn the dough onto a floured surface and gently roll or pat into a circle about 1/4 inch (6mm) thick.
- Cut the circle into four equal wedges or ‘farls.’
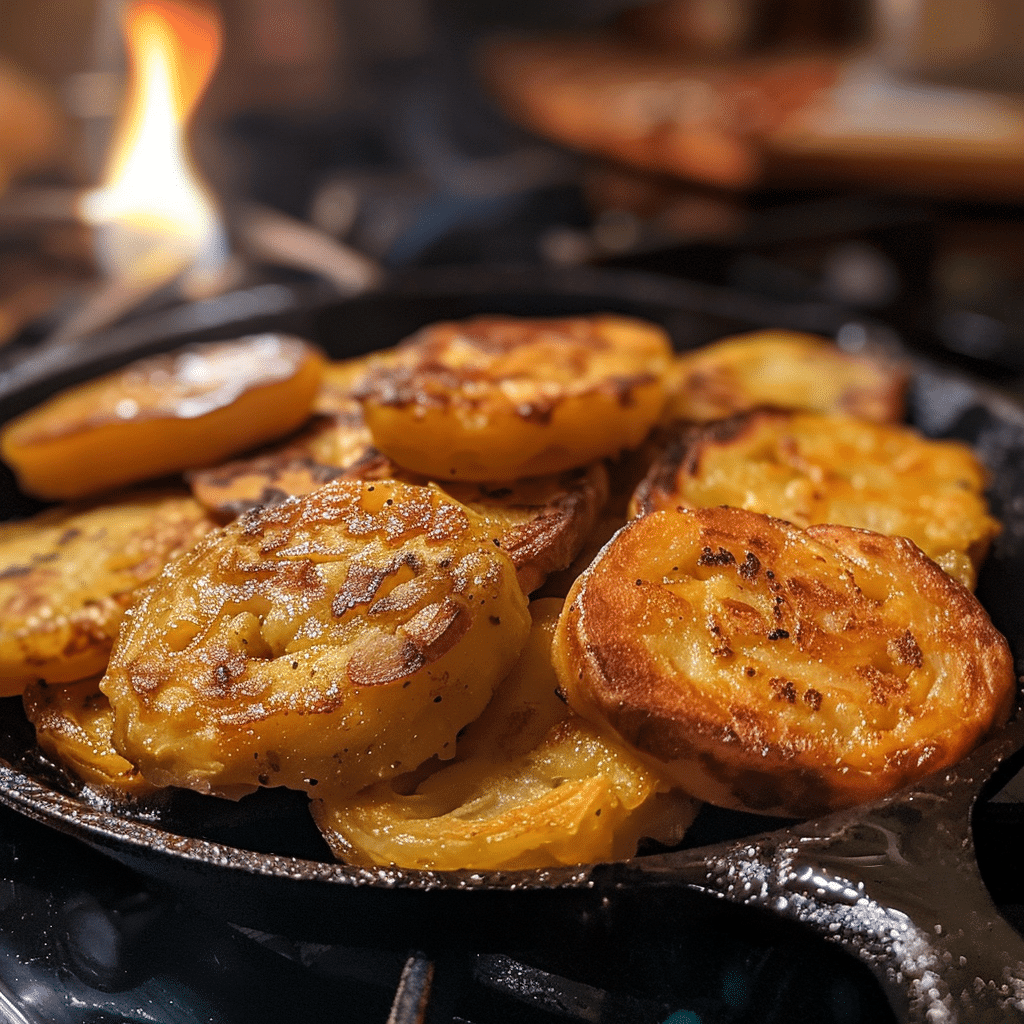
- Heat a dry skillet or griddle over medium heat. Cook the farls for about 3–4 minutes on each side, until golden brown and slightly crisp.
- Serve warm with butter, fried eggs, or alongside bacon for a traditional Irish breakfast.
Notes
- Use leftover mashed potatoes for a quick version.
- For extra flavor, mix in chopped chives, cheese, or black pepper to the dough.
- Can be stored in the refrigerator for up to 2 days and reheated in a skillet.
- Best served hot with a pat of butter or a drizzle of cream.
- Prep Time: 10 mins
- Cook Time: 10 mins
- Category: Breakfast
- Method: Pan-Frying
- Cuisine: Irish
Ingredients
(Tip: You can find the complete list of ingredients and their measurements in the recipe card below.)
Potatoes: The foundation of this recipe — starchy varieties like Russet or Maris Piper work best for a light, fluffy texture.
All-purpose flour: Helps bind the potatoes and gives structure to the farls.
Butter: Adds rich flavor and tenderness to the dough.
Salt: Enhances the flavor and balances the richness of the butter.
Black pepper (optional): Adds a touch of warmth and depth.
Butter or oil (for frying): Used to cook the farls until golden brown and crisp.
Directions
Boil the potatoes in salted water until tender, then drain well. Mash them while still warm with butter and salt until smooth. Allow the mixture to cool slightly.
Add flour gradually to the mashed potatoes and mix until a soft dough forms. You may not need all the flour — just enough to make the dough smooth but not sticky. Turn it onto a floured surface and gently knead for a minute.
Shape the dough into a round disk about ½ inch thick. Using a sharp knife, cut the circle into four even quarters (called “farls” in Irish, meaning “four parts”).
Heat a lightly greased frying pan or griddle over medium heat. Cook each farl for about 3–4 minutes per side, or until golden brown and lightly crisped. Serve immediately with butter, eggs, or your favorite breakfast accompaniments.
Equipment needed :
Must-Have Tools to Get Rolling
Here’s what you’ll want to have on hand:
Silicone Spatula – Durable, heat-resistant silicone spatula perfect for mixing, scraping, and spreading. Gentle on non-stick cookware and easy to clean.
Large pot – You’ll need this to boil the whole cabbage head and soften the leaves.
large bowl –Spacious, durable large bowl ideal for mixing, serving, or food preparation. Made from sturdy material and easy to clean.
Sharp knife – For coring the cabbage and slicing out the thick stem in each leaf. A paring knife works best.
Mixing bowl – A big bowl makes it easier to combine your meat and rice filling evenly.
Cutting board – For prepping cabbage leaves and rolling them like a pro.
9×13-inch baking dish – Ideal size to fit your rolled cabbage leaves snugly and prevent them from unraveling.
knife – A sharp, durable kitchen knife perfect for slicing, chopping, and dicing with ease.
Servings and timing
Serves 4
Preparation time: 10 minutes
Cooking time: 10 minutes
Total time: About 20 minutes
Storage/reheating
Store leftover farls in an airtight container in the refrigerator for up to 3 days. To reheat, warm them in a dry skillet or on a griddle over medium heat until heated through. You can also freeze them — separate layers with parchment paper and store in a freezer bag for up to 2 months. Reheat straight from frozen on a skillet for best results.

Variations and Customizations
Cheesy Potato Farls: Add grated cheddar or Irish cheese to the dough for a rich, savory twist.
Herb Potato Farls: Mix in fresh herbs like chives, parsley, or thyme for extra flavor.
Garlic Butter Farls: Brush the farls with garlic butter before serving for a fragrant upgrade.
Sweet Potato Farls: Substitute half the potatoes with sweet potatoes for a slightly sweet, colorful variation.
Wholemeal Potato Farls: Replace some of the flour with whole wheat flour for a nutty flavor.
Bacon and Onion Farls: Stir finely chopped cooked bacon and caramelized onions into the dough for a hearty version.
Spiced Farls: Add a pinch of smoked paprika or cayenne for a subtle kick.
Vegan Potato Farls: Use plant-based butter and oil for frying — just as delicious!
Potato Pancake Style: Shape the dough thinner for crispy potato cakes instead of traditional farls.
Loaded Breakfast Farls: Top with poached eggs, smoked salmon, or avocado for a modern brunch option.
FAQs
What are potato farls?
They’re traditional Irish potato cakes made with mashed potatoes, flour, butter, and salt — cooked on a griddle or pan.
Can I use leftover mashed potatoes?
Yes, that’s actually traditional! Just make sure they’re not overly creamy or seasoned.
Why are they called “farls”?
“Farl” comes from the Gaelic word fardel, meaning “four parts,” referring to how the dough is cut into quarters.
Can I make them ahead of time?
Yes, you can make the dough or cook the farls in advance and reheat before serving.
Can I bake instead of frying?
Yes, bake at 200°C (400°F) for about 15–20 minutes until golden, flipping halfway through.
What do you serve with potato farls?
They’re perfect with eggs, sausages, bacon, baked beans, or simply butter and jam.
Can I make these gluten-free?
Yes, use a gluten-free flour blend instead of regular flour.
Why is my dough too sticky?
Add a little more flour until it’s smooth and easy to handle, but avoid overworking it.
Can I freeze cooked farls?
Absolutely. Freeze with parchment between layers to prevent sticking.
Do I need to peel the potatoes?
Peeling gives a smoother texture, but leaving the skins on adds a rustic, earthy flavor.
Conclusion
This Traditional Irish Potato Farls Recipe is a celebration of Irish simplicity and comfort. With just a few ingredients, you can create a warm, satisfying side that’s perfect for any breakfast or brunch table. Crispy on the outside, soft on the inside, and wonderfully buttery, these farls bring a touch of Ireland to your kitchen. Serve them with eggs and sausages for an authentic Irish breakfast or enjoy them on their own with butter — either way, they’re a true classic that never goes out of style.
Hungry for more? Visit our website for full recipes and follow us on Pinterest for daily foodie inspo you’ll love to pin!