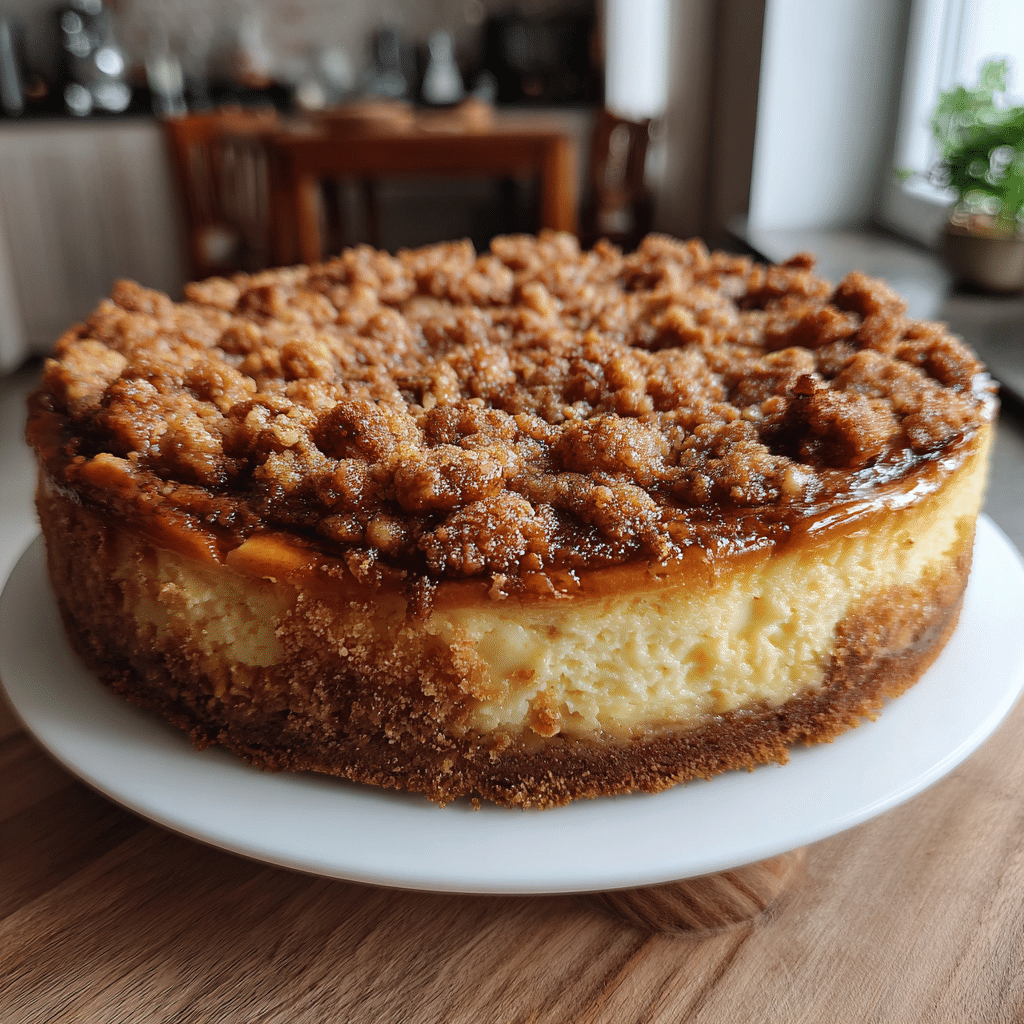
If you love the cozy flavors of apple pie and the creamy indulgence of cheesecake, this Apple Crumble Cheesecake brings the best of both worlds together in one stunning dessert. A buttery graham cracker crust forms the base for a velvety cheesecake layer, topped with spiced caramelized apples and a golden crumble that adds the perfect crunch. I tried using a mix of Honeycrisp and Granny Smith apples for a balance of sweetness and tartness—it worked beautifully! This cheesecake is a showstopper for any gathering, from Thanksgiving to a casual weekend treat, and it’s easier to make than it looks.
Why You’ll Love This Recipe
This Apple Crumble Cheesecake combines classic fall flavors with creamy, bakery-quality texture. The buttery crumble topping gives each bite a satisfying crunch, while the cheesecake filling stays rich yet light. The spiced apples create a warm, comforting flavor that perfectly complements the smooth cream cheese base. Whether you serve it chilled or slightly warm, it’s an irresistible dessert that feels festive and homey at the same time. Plus, it’s an excellent make-ahead option—perfect for holidays or dinner parties.
Apple Crumble Cheesecake – The Perfect Fall Dessert Fusion
- Total Time: 1 hr 25 mins
- Yield: 12 servings
- Diet: Vegetarian
Description
Apple Crumble Cheesecake is a decadent dessert that combines creamy vanilla cheesecake, cinnamon-spiced apples, and a buttery crumble topping. It’s the perfect fall treat that brings together the best parts of apple pie and cheesecake in one irresistible bite.
Ingredients
- 1 1/2 cups graham cracker crumbs
- 1/4 cup granulated sugar
- 1/2 cup unsalted butter, melted
- 3 (8 oz) packages cream cheese, softened
- 1 cup granulated sugar
- 3 large eggs
- 1 tsp vanilla extract
- 1/2 cup sour cream
- 2 large apples, peeled and diced
- 2 tbsp brown sugar
- 1 tsp ground cinnamon
- 1 tbsp all-purpose flour
- 1/2 cup old-fashioned oats
- 1/3 cup brown sugar
- 1/2 cup all-purpose flour
- 1/4 cup cold unsalted butter, cubed
Instructions
- Preheat oven to 325°F (160°C). Grease a 9-inch springform pan and line the bottom with parchment paper.
- In a bowl, mix graham cracker crumbs, sugar, and melted butter. Press firmly into the bottom of the pan to form the crust. Bake for 8 minutes, then let cool.
- In a large mixing bowl, beat cream cheese and sugar until smooth and creamy. Add eggs one at a time, mixing after each addition. Stir in vanilla and sour cream until fully combined.
- In a separate bowl, toss diced apples with brown sugar, cinnamon, and 1 tbsp flour.
- Pour half of the cheesecake batter over the crust. Add the apple mixture, then top with the remaining cheesecake batter and smooth the top.
- In another bowl, prepare the crumble topping by combining oats, brown sugar, flour, and cubed butter. Mix with a fork or fingers until crumbly.
- Sprinkle crumble evenly over the cheesecake.
- Bake for 55–65 minutes, or until the center is just set. Turn off the oven and let cheesecake cool with the door slightly open for 1 hour.
- Refrigerate for at least 4 hours or overnight before serving.
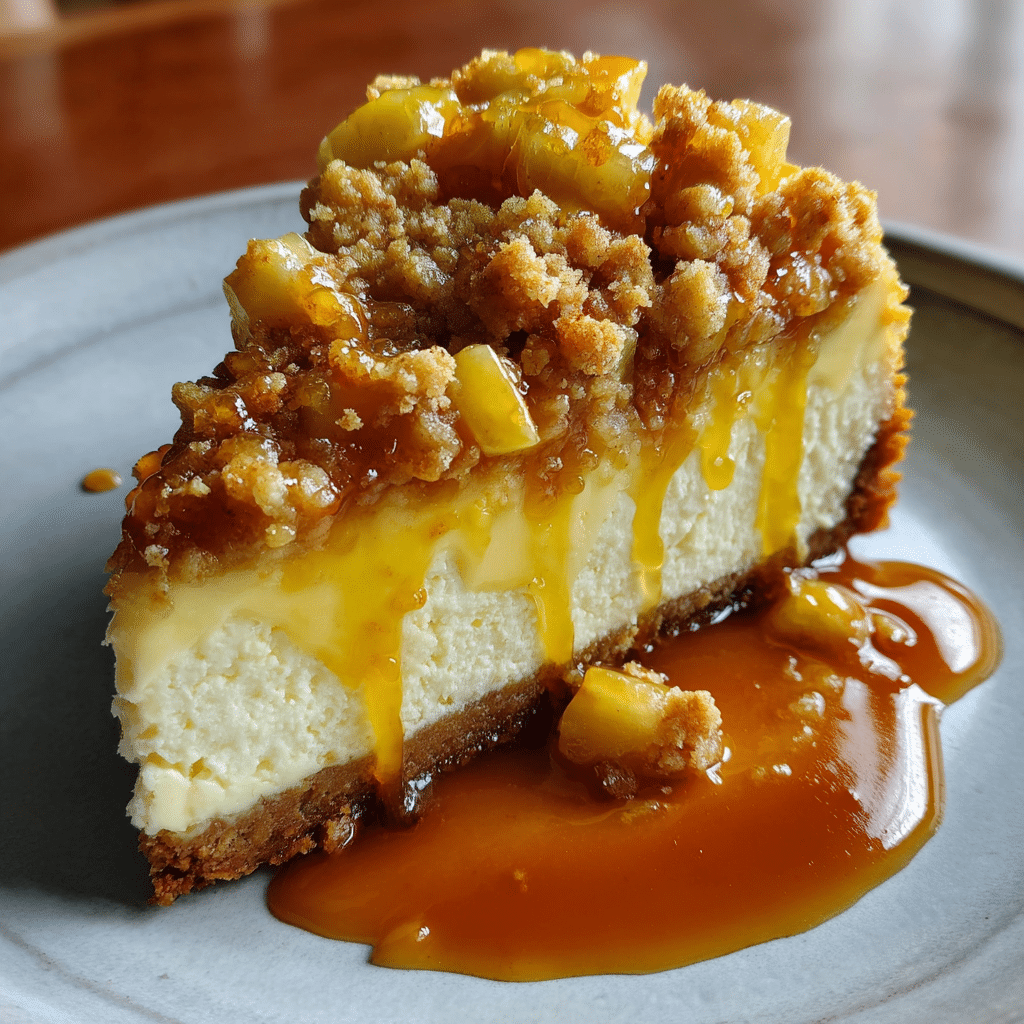
- Optional: Drizzle with caramel sauce before serving for extra indulgence.
Notes
- For best texture, chill overnight before slicing.
- You can use Granny Smith or Honeycrisp apples for the perfect balance of tart and sweet.
- Store leftovers covered in the refrigerator for up to 5 days.
- Prep Time: 25 mins
- Cook Time: 1 hr
- Category: Dessert
- Method: Baked
- Cuisine: American
Ingredients
(Tip: You can find the complete list of ingredients and their measurements in the recipe card below.)
Graham Cracker Crumbs: Form the buttery crust that gives the cheesecake its sturdy, flavorful base. Digestive biscuits or gingersnaps also work beautifully.
Butter: Melted butter binds the crust and adds richness to both the base and the crumble topping.
Cream Cheese: The star of the cheesecake layer—smooth, creamy, and slightly tangy. Full-fat cream cheese works best for texture and taste.
Sugar: Adds sweetness and balances the tang of the cream cheese and the tartness of the apples.
Eggs: Bind the cheesecake filling, giving it structure and creaminess.
Sour Cream: Enhances the creaminess of the cheesecake while adding a subtle tang.
Vanilla Extract: Deepens the flavor and complements the apples and cream cheese beautifully.
Apples: Choose firm varieties like Granny Smith or Honeycrisp that hold their shape during baking.
Brown Sugar: Adds a caramel-like sweetness to the apple filling and crumble topping.
Cinnamon: The signature spice for apple desserts—it brings warmth and coziness to every bite.
Nutmeg: Adds depth and complexity to the apple mixture.
Flour: Used in the crumble topping to create texture and crispness.
Oats: Give the crumble topping a hearty, bakery-style crunch.
Lemon Juice: Prevents the apples from browning and enhances their tart flavor.
Directions
Preheat your oven to 325°F (160°C). Grease and line the bottom of a springform pan with parchment paper.
Make the Crust
In a bowl, combine graham cracker crumbs with melted butter and a spoonful of sugar. Press the mixture firmly into the bottom of the pan. Bake for 10 minutes, then set aside to cool.
Prepare the Cheesecake Layer
Beat the cream cheese until smooth, then add sugar, sour cream, and vanilla extract. Mix in the eggs one at a time, blending just until combined. Pour the mixture over the cooled crust and smooth the top.
Cook the Apple Filling
In a skillet over medium heat, melt butter and add chopped apples, brown sugar, cinnamon, nutmeg, and a splash of lemon juice. Cook for about 5–7 minutes until the apples soften slightly and the mixture becomes syrupy. Spread the apple mixture evenly over the cheesecake layer.
Make the Crumble Topping
In another bowl, mix flour, oats, brown sugar, and melted butter until crumbly. Sprinkle the topping evenly over the apples.
Bake the cheesecake for 55–65 minutes, or until the center is mostly set but still slightly jiggly. Turn off the oven and let it cool inside with the door slightly open for 1 hour. Refrigerate for at least 4 hours (or overnight) before serving.
Top with caramel drizzle or a dollop of whipped cream before slicing for a bakery-worthy presentation.
Essential Equipment :
Must-Have Tools to Get Rolling
Here’s what you’ll want to have on hand:
Silicone Spatula – Durable, heat-resistant silicone spatula perfect for mixing, scraping, and spreading. Gentle on non-stick cookware and easy to clean.
Large pot – You’ll need this to boil the whole cabbage head and soften the leaves.
large bowl –Spacious, durable large bowl ideal for mixing, serving, or food preparation. Made from sturdy material and easy to clean.
Sharp knife – For coring the cabbage and slicing out the thick stem in each leaf. A paring knife works best.
Mixing bowl – A big bowl makes it easier to combine your meat and rice filling evenly.
Cutting board – For prepping cabbage leaves and rolling them like a pro.
9×13-inch baking dish – Ideal size to fit your rolled cabbage leaves snugly and prevent them from unraveling.
knife – A sharp, durable kitchen knife perfect for slicing, chopping, and dicing with ease.
Servings and timing
This recipe makes 10–12 slices.
Prep time: 25 minutes
Cook time: 1 hour
Chill time: 4 hours
Total time: 5 hours 25 minutes
Perfect for serving 10–12 people as a festive dessert.
Storage/reheating
Store the cheesecake in the refrigerator for up to 5 days. Keep it covered to prevent it from drying out. You can also freeze individual slices for up to 2 months—just thaw overnight in the fridge before serving. Avoid reheating; serve chilled or at room temperature for the best texture.
Variations and Customizations
Caramel Apple Cheesecake: Drizzle salted caramel sauce over the top for a decadent twist.
Maple Infusion: Replace sugar in the filling with pure maple syrup for a deeper, fall-inspired sweetness.
Nutty Crunch: Add chopped pecans or walnuts to the crumble topping for extra texture.
Mini Cheesecakes: Make individual servings in muffin tins for portion-controlled desserts.
Gluten-Free Option: Use gluten-free graham crackers and oat flour in the crust and topping.
Apple Pie Fusion: Add a layer of apple pie filling instead of fresh apples for extra convenience.
Cinnamon Swirl: Add a cinnamon sugar swirl into the cheesecake batter for extra spice.
Lighter Version: Substitute Greek yogurt for sour cream for a slightly lighter, tangy flavor.
Pumpkin Twist: Mix a few spoonfuls of pumpkin puree into the cheesecake layer for a seasonal hybrid dessert.
Crisp Topping: Toast the crumble separately and sprinkle it on just before serving for added crunch.
FAQs
1. Can I make this cheesecake ahead of time?
Yes, it tastes even better the next day after chilling overnight.
2. What kind of apples work best?
Granny Smith and Honeycrisp are ideal because they hold their shape and balance sweet and tart flavors.
3. Do I need to use a water bath?
Not for this recipe, but you can if you want a smoother texture with fewer cracks.
4. Can I use store-bought apple pie filling?
Yes, it’s a convenient substitute for the apple topping.
5. Can I freeze the cheesecake?
Absolutely! Wrap tightly and freeze for up to 2 months.
6. How do I prevent the crust from getting soggy?
Cool the crust completely before adding the filling, and bake the cheesecake fully to set the layers.
7. Can I make it gluten-free?
Yes, use gluten-free graham crackers and oats.
8. How long should I chill it before serving?
At least 4 hours, but overnight chilling gives the best results.
9. What sauce pairs well with it?
Caramel, cinnamon glaze, or a simple whipped cream topping are perfect.
10. Can I use a different fruit?
Yes, pears or peaches work beautifully as seasonal variations.
Conclusion
This Apple Crumble Cheesecake is a show-stopping dessert that celebrates the cozy flavors of fall in every bite. With its creamy cheesecake base, spiced apple filling, and buttery crumble topping, it’s the perfect balance of sweet, tangy, and crunchy. Whether you’re serving it for the holidays or as a special treat, this dessert delivers the comforting warmth of apple pie and the creamy indulgence of cheesecake—all in one irresistible creation. It’s a true fall classic you’ll want to make year after year.