

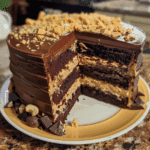
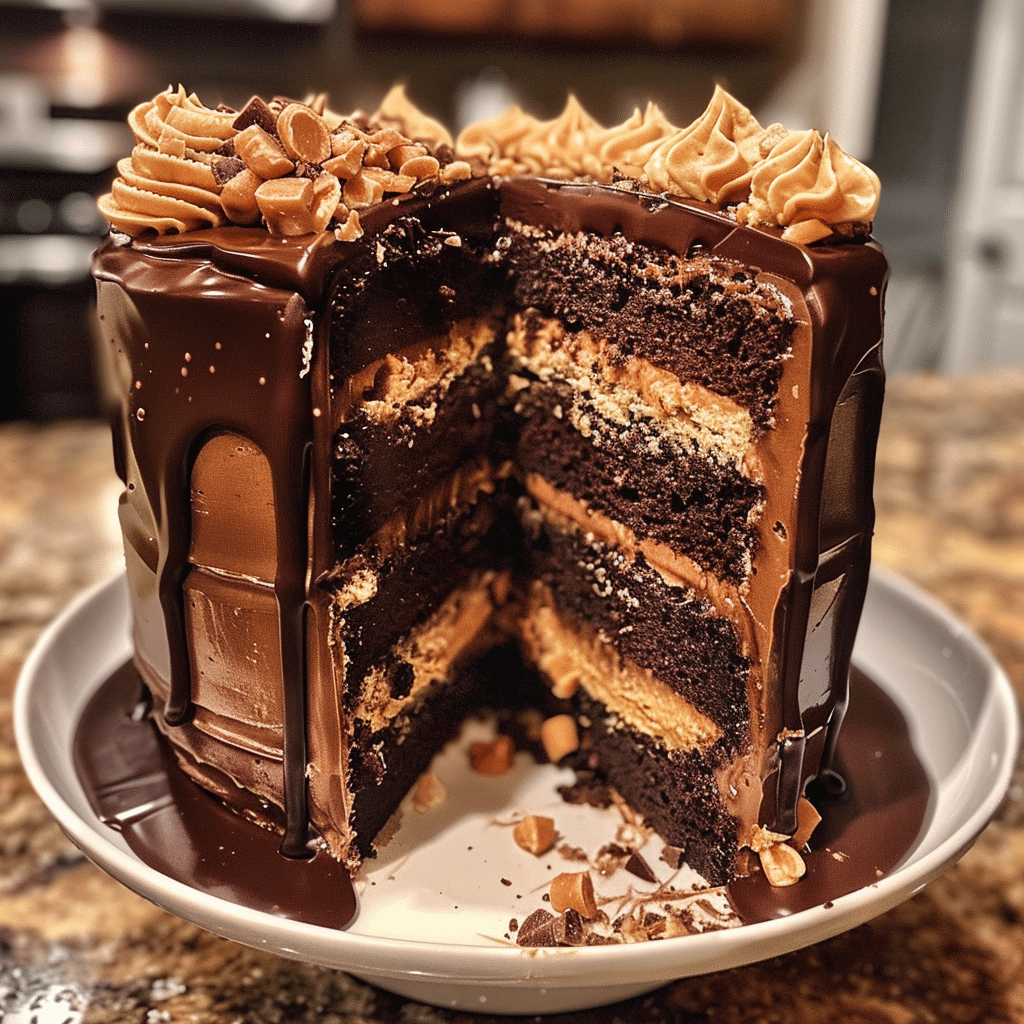
This Chocolate Peanut Butter Layer Cake is the ultimate indulgence for dessert enthusiasts. Picture rich, moist layers of chocolate cake enveloped in creamy peanut butter frosting — it’s the perfect harmony of sweet and salty, soft and rich. Every bite offers an explosion of flavors that feel both comforting and luxurious. I’ve always been a huge fan of the chocolate-peanut butter duo, and this cake brings that classic combination to life in the most elegant way. I tried this once using natural peanut butter, and while it added a subtle nutty depth, a regular creamy peanut butter gave me the best, smoothest frosting texture. This showstopper is ideal for birthdays, holidays, or simply when you need a slice of pure joy. Let’s dive into what makes this cake so irresistible.
Why You’ll Love This Recipe
This recipe strikes the perfect balance between richness and sweetness. The chocolate layers are tender and moist without being overly dense, and the peanut butter frosting offers a smooth, luscious contrast. The recipe is easy to follow, and even beginner bakers can achieve bakery-worthy results. Best of all, you can prepare it ahead of time — the flavors deepen beautifully after a day.
Decadent Chocolate Peanut Butter Layer Cake Recipe: A Dream Dessert for Chocolate Lovers
- Total Time: 1 hr
- Yield: 12 servings
- Diet: Vegetarian
Description
Chocolate Peanut Butter Layer Cake is a rich, indulgent dessert featuring moist chocolate cake layers filled and frosted with a creamy, salty-sweet peanut butter frosting. Finished with a glossy chocolate ganache, it’s the ultimate treat for chocolate and peanut butter lovers alike.
Ingredients
- For the Chocolate Cake:
- 2 cups all-purpose flour
- 2 cups granulated sugar
- 3/4 cup unsweetened cocoa powder
- 2 tsp baking powder
- 1 1/2 tsp baking soda
- 1 tsp salt
- 1 cup buttermilk, room temperature
- 1/2 cup vegetable oil
- 2 large eggs
- 2 tsp vanilla extract
- 1 cup hot coffee (or hot water)
- For the Peanut Butter Frosting:
- 1 cup unsalted butter, softened
- 1 cup creamy peanut butter
- 3 cups powdered sugar
- 1/4 cup heavy cream (plus more as needed)
- 1 tsp vanilla extract
- Pinch of salt
- For the Chocolate Ganache (optional topping):
- 1 cup semi-sweet chocolate chips
- 1/2 cup heavy cream
Instructions
- Preheat oven to 350°F (175°C). Grease and line three 8-inch round cake pans with parchment paper.
- In a large bowl, whisk together flour, sugar, cocoa powder, baking powder, baking soda, and salt.
- Add buttermilk, oil, eggs, and vanilla. Mix until smooth, then slowly pour in hot coffee and stir until well combined (batter will be thin).
- Divide batter evenly between pans and bake for 25–30 minutes, or until a toothpick inserted in the center comes out clean. Cool cakes completely before frosting.
- For the frosting: Beat butter and peanut butter together until creamy and smooth. Gradually add powdered sugar, then beat in vanilla, salt, and heavy cream until fluffy and spreadable.
- For the ganache: Heat heavy cream in a saucepan until just simmering. Pour over chocolate chips and let sit for 2 minutes, then stir until smooth and glossy.
- Assemble the cake: Place one cake layer on a serving plate, spread with a thick layer of peanut butter frosting. Repeat with the next layers, finishing with frosting on top and sides.
- Pour cooled ganache over the top, letting it drip slightly down the sides. Chill for 15 minutes before serving.
Notes
- For a crunch, sprinkle chopped peanuts or crushed peanut butter cups between layers.
- This cake keeps well covered in the refrigerator for up to 5 days.
- Let cake sit at room temperature for 30 minutes before serving for the best texture.
- Prep Time: 30 mins
- Cook Time: 30 mins
- Category: Dessert
- Method: Baked
- Cuisine: American
Ingredients
(Tip: You can find the complete list of ingredients and their measurements in the recipe card below.)
All-purpose flour
Forms the base structure of the cake, ensuring it holds its shape while staying soft. I like to sift it beforehand to achieve a lighter texture.
Cocoa powder
Adds the rich, deep chocolate flavor. Opt for unsweetened Dutch-processed cocoa for a smoother, darker taste.
Baking powder and baking soda
These leavening agents ensure the cake rises beautifully, creating airy layers that remain moist.
Sugar
Sweetens the batter and balances the bitterness of the cocoa. I’ve tried brown sugar once for a deeper molasses flavor, and it worked wonderfully.
Eggs
Bind the ingredients together and contribute to the cake’s soft, tender crumb.
Buttermilk
Gives a subtle tanginess and keeps the cake moist. If you don’t have buttermilk, mix milk with a bit of lemon juice as a substitute.
Vegetable oil
Adds richness and prevents the cake from drying out. It helps retain that melt-in-the-mouth softness even after refrigeration.
Vanilla extract
Enhances the overall flavor, adding warmth and depth to both the cake and the frosting.
Peanut butter
The star of the frosting! Choose creamy peanut butter for a smooth texture. I once experimented with chunky peanut butter for added crunch — it was delightful.
Butter
Creates a silky frosting base when whipped with peanut butter, adding lightness and structure.
Powdered sugar
Sweetens and stabilizes the frosting while giving it that perfectly fluffy consistency.
Heavy cream
Adds richness and helps achieve the right spreading texture for the frosting.
Directions
Preheat your oven to 350°F (175°C). Grease and line three 8-inch round cake pans with parchment paper. In a bowl, whisk together flour, cocoa powder, baking powder, and baking soda. In a separate bowl, beat eggs and sugar until fluffy. Add oil, vanilla, and buttermilk, mixing until smooth. Gradually combine the dry ingredients with the wet mixture, stirring until just incorporated. Avoid overmixing. Divide the batter evenly between the pans and bake for 25–30 minutes, or until a toothpick inserted in the center comes out clean. Let the cakes cool in their pans for 10 minutes, then transfer to a wire rack to cool completely. For the frosting, beat butter and peanut butter together until creamy. Gradually add powdered sugar, alternating with heavy cream, until you reach the desired consistency. Assemble the cake by placing one layer on a serving plate, spreading frosting evenly, then stacking the next layer. Continue until all layers are used. Frost the top and sides, smoothing with a spatula. Chill for 30 minutes before slicing for perfect layers.
Equipment needed :
Must-Have Tools to Get Rolling
Here’s what you’ll want to have on hand:
Silicone Spatula – Durable, heat-resistant silicone spatula perfect for mixing, scraping, and spreading. Gentle on non-stick cookware and easy to clean.
Large pot – You’ll need this to boil the whole cabbage head and soften the leaves.
large bowl –Spacious, durable large bowl ideal for mixing, serving, or food preparation. Made from sturdy material and easy to clean.
Sharp knife – For coring the cabbage and slicing out the thick stem in each leaf. A paring knife works best.
Mixing bowl – A big bowl makes it easier to combine your meat and rice filling evenly.
Cutting board – For prepping cabbage leaves and rolling them like a pro.
9×13-inch baking dish – Ideal size to fit your rolled cabbage leaves snugly and prevent them from unraveling.
knife – A sharp, durable kitchen knife perfect for slicing, chopping, and dicing with ease.
Servings and timing
Servings: 10–12 slices
Preparation time: 30 minutes
Baking time: 30 minutes
Cooling and assembly: 1 hour
Total time: Approximately 2 hours
Storage/reheating
Store the cake covered in the refrigerator for up to 5 days. For the best flavor, allow slices to come to room temperature before serving. You can also freeze unfrosted cake layers for up to 2 months — just wrap them tightly in plastic wrap.
Variations and Customizations
Chocolate Ganache Drip
Pour a glossy chocolate ganache over the top for a stunning presentation and extra indulgence.
Crunchy Peanut Twist
Add chopped roasted peanuts between the layers for texture and a hint of saltiness.
Salted Caramel Swirl
Drizzle caramel sauce between layers or over the frosting for a sweet-salty flavor combination.
Vegan Option
Use plant-based milk, vegan butter, and an egg substitute. I tried it with oat milk and coconut oil — the texture was surprisingly rich.
Cupcake Conversion
Turn this recipe into cupcakes by baking the batter in liners for 18–20 minutes — perfect for parties or portion control.
Espresso Infusion
Add a teaspoon of espresso powder to the cake batter to intensify the chocolate flavor.
FAQs
Can I make this cake ahead of time?
Yes, the cake layers can be baked a day ahead and stored covered at room temperature. Frost just before serving.
Can I use natural peanut butter?
You can, but the frosting may turn slightly grainy. Creamy commercial peanut butter works best.
Can I freeze the finished cake?
Yes, wrap the cake tightly and freeze for up to 2 months. Thaw in the refrigerator overnight.
How can I make the cake more moist?
Add a tablespoon of sour cream or replace part of the oil with melted butter for extra richness.
What if I don’t have buttermilk?
Mix 1 cup of milk with 1 tablespoon of vinegar or lemon juice and let it sit for 5 minutes.
Can I use dark chocolate instead of cocoa powder?
Yes, but reduce the sugar slightly to balance the sweetness.
How do I prevent the cake from doming?
Bake evenly by ensuring your oven temperature is correct and avoid overmixing the batter.
Can I make this gluten-free?
Yes, substitute all-purpose flour with a 1:1 gluten-free blend.
Can I use a different frosting?
Absolutely. Cream cheese or chocolate ganache pairs beautifully with the chocolate layers.
What’s the best way to slice clean layers?
Chill the cake for 30 minutes before slicing and use a sharp serrated knife.
Conclusion
This Chocolate Peanut Butter Layer Cake is pure dessert perfection — rich, creamy, and bursting with flavor in every bite. Whether you’re baking for a celebration or simply treating yourself, it’s a guaranteed crowd-pleaser. The layers come together effortlessly, and the frosting adds just the right amount of nutty sweetness. Try it once, and you’ll find yourself making it again and again — because some combinations, like chocolate and peanut butter, are simply meant to be.